Friday 4 December 2020

生日蛋糕

儿子5岁生日蛋糕食谱记录。


食材

模具 : 蛋糕模6吋
 
蛋白霜 :

細砂糖 25g
蛋白 2顆
檸檬汁 1小匙 
 
麵糊
牛奶 100g
起司片 4片
細砂糖 25g
蛋黃 2顆 
 
 
  • 事前準備工作: 麵粉過篩、分蛋、起司撕成條狀、烤箱預熱160度、蛋糕模抹一層薄薄的奶油並在底部鋪上烘焙紙。

  • 製作[麵糊]:將牛奶、奶油、起司片和細砂糖隔水加熱至完全融化。

    製作麵糊:將牛奶、奶油、起司片和細砂糖隔水加熱至完全融化。

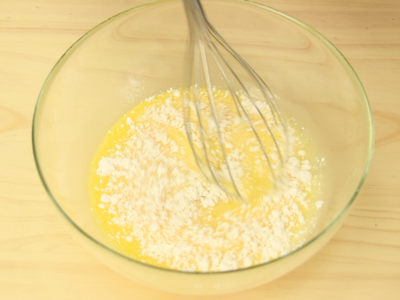
  • 待牛奶液降至手溫後(約40~50度即可),加入蛋黃液攪拌均勻。再分2~3次加入麵粉攪拌至看不到麵粉。

    待牛奶液降至手溫後(約40~50度即可),加入蛋黃液攪拌均勻。再分2~3次加入麵粉攪拌至看不到麵粉。

  • 打發[蛋白霜]至溼性發泡。
打發蛋白霜詳細做法可以參考愛料理TV:https://tv.icook.tw/whipping-egg-white

    打發蛋白霜至溼性發泡。 打發蛋白霜詳細做法可以參考愛料理TV:https://tv.icook.tw/whipping-egg-white

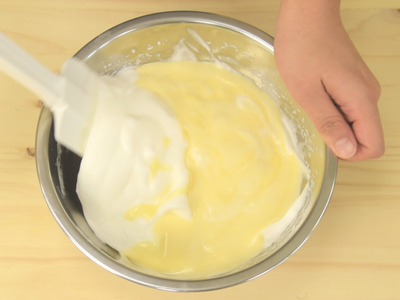
  • 蛋白霜切1/3的量放入麵糊中,攪拌均勻後再倒回蛋白霜中,並以切拌手法混合均勻。這個步驟動作要快以免蛋白霜消泡。

    蛋白霜切1/3的量放入麵糊中,攪拌均勻後再倒回蛋白霜中,並以切拌手法混合均勻。這個步驟動作要快以免蛋白霜消泡。

 
蛋糕食谱视频来自于 : https://icook.tw/recipes/120527 
 
蛋糕内陷 :
300ml 低糖鲜奶油 (low sugar whipping cream)

蛋糕装饰 Topping :
Grated Cheese


北海道杯子蛋糕
 
除了要准备一个大蛋糕,还要做这个北海道杯子蛋糕。

🔶【戚风蛋糕杯】

鸡蛋 8个

细砂糖 60克(蛋白用)

细砂糖 20克(蛋黄用)

牛奶 60克

玉米油 60克

柠檬汁 几滴

低筋面粉 70克

蛋糕杯 14只

✅【做法】

1.牛奶与植物油搅拌乳化,加细砂糖搅拌均匀。

2.鸡蛋蛋清蛋黄分离,蛋黄加入其中,搅拌均匀,再筛入低粉拌匀。

3.蛋白加入几滴柠檬汁,细砂糖分三次加入蛋白中,打发至提起有尖挺的大弯钩状。(湿性发泡)

4.取三分之一蛋白与蛋黄糊翻拌均匀,再倒回剩余蛋白中,翻拌均匀。

5.分装在蛋糕杯中,轻震几下,送入提前预热好的烤箱中层,150度烘烤30分钟,烤好取出放凉备用。


🔶【咸芝士卡士达酱】

奶油奶酪 200克

细砂糖 20克(芝士糊用)

海盐 4克

淡奶油 100克

牛奶 100克(芝士糊用)

蛋黄 4个

纯牛奶 500克(卡士达酱用)

细砂糖 40克(卡士达酱用)

玉米淀粉 50克

糖粉 适量(表面用)


✅【做法】

1.先做芝士糊,奶油奶酪加细砂糖加海盐,隔热水软化顺滑。

2.再加入牛奶、淡奶油混合均匀备用。

3.接着做卡士达酱,蛋黄加细砂糖搅拌均匀,筛入低粉拌匀。

4.牛奶加热至微微冒泡,倒入蛋糊中,边倒入边搅拌均匀,再倒回奶锅中,小火加热至浓稠状。

5.再把芝士糊与卡士达酱混合均匀,馅料就做好了。

6.挤入烤好的戚风蛋糕中,表面撒上些许糖粉就做好啦。

 **以上的食谱记录是小红书的双倍分量。


食谱来自于小红书 :北海道杯子蛋糕 西瓜食光发布了一篇小红书笔记,快来看吧!😆 mMBKSW2IsIZzyfp 😆 http://xhslink.com/4nmWX,复制本条信息,打开【小红书】App查看精彩内容!


鲜肉包 (包子配方表)


材料/ / 步骤 :

步骤 1 :

500g 普通面粉

8g 猪油

3g泡打粉 (放不放都可以)

5g 酵母

10g 白糖

255g 温水

酵母白糖温水化开


步骤 2 :

揉成光滑面团

包子制作后,醒发30分钟左右。


步骤 3 :

面团排气,分成16个小面团。包上馅料。再醒发10分钟。


步骤 4

冷水上锅,放入包子继续在锅上醒发直到蒸笼冒出蒸汽才开始计算蒸10分钟。10分钟后关火,不要打开蒸笼盖,再焖5分钟直到没有冒蒸气。包子就不会塌陷了。


  1. 参考以下视频:蜀食一家铁建广场包子店发布了一篇小红书笔记,快来看吧!😆 Acf8Kofryn9pTFl 😆 http://xhslink.com/icInX,复制本条信息,打开【小红书】App查看精彩内容!
  2. 1小点的厨房发布了一篇小红书笔记,快来看吧!😆 WaxWRdnved2P73I 😆 http://xhslink.com/7XHnX,复制本条信息,打开【小红书】App查看精彩内容!

馅料可以自己喜欢放什么都可以。


Sunday 2 August 2020

Angel Hair with Homemade Pesto Sauce


Dinner for the kiddos tonight using my Homemade Nut Free Pesto Sauce.  Son was allergic with all kind of nuts.  Therefore I made my own version of pesto sauce yesterday since friend of my mom given me a lot of basil leave.  I open my refridgerator to check the the available ingredients.   Then I started to clean the leaves and dump all the ingredients into my blender to blend it till puree form.  

At night, when we have bed time conversation, my daughter told me that long time she didn't eat my homemade chicken pie.  Well, okay!  I done it as per request today.  When I'm making my chicken pie, my picky eater boy tells me that he doesn't want to eat the chicken meat.  Then I ask them to choose their own favourite cartoon shape then I'm goin to put onto the pie okay My Majesty??  Finally we make the deal!  When done baking, I ask the picky eater boy how it taste?  He gives me a thumbs up.  :-) That's good they like it.

Below is my own version of Nut Free Pesto Sauce

This fantastic sauce can be use to stir fry meat or spaghetti sauce.  

Ingredients :
1 cup of basil leaves
1/2 cup of pumpkin seeds
1/4 cup parmesan cheese
1/2 - 1 tsp Salt
1/4 cup of Olive oil
Mushroom powder


Sunday 12 July 2020

Sweet & Sour Chicken with Cherry Tomato 甜酸鸡


今天身体不适,就简简单单煮这甜酸鸡腿给孩子晚餐。昨天婆婆从山巴拿了好多小番茄回家。所以今天就拿来焖鸡肉。酸酸甜甜女儿最喜欢。

材料:
鸡腿(用盐腌制)
小番茄
大葱
小红葱
姜片

调味料:
酸梅酱
番茄酱
耗油

步骤:
  1. 热锅,炒香蒜,小红葱。
  2. 放入鸡腿肉,煎一下。加入水喝调味料。焖一下,再加入其余的小番茄和大葱,焖直鸡腿全熟。就可以上碟了。要多点酱汁的可以放多点水去焖煮。

Tuesday 7 July 2020

Basil Fried Meat 九层塔炒肉片


This is one of my favourite dishes.  I use my home grown basil leaves to cook this as lunch today.  I use chicken breast meat and pork fillet.  Just fried with garlic and basil leaves until all the ingredients fully cooked. 

Ingredients :
Pork meat fillet
Chicken breast meat
Basil leaves
Garlic
Small red onion

Marinate :
Salt
Pepper
Oil
Corn flour
Oyster sauce
light soy sauce

Method :

  1. Heat up pan with oil, fried garlic and red onion a while.  Add in meat ingredients fried for a while
  2. Lastly add in basil leaves and keep fried until you can smell the fragrant of basil leaves.  Dished up.

Asam Fish


周末买了这条牙点鱼,用了一半来煮这ASAM鱼。由于孩子不吃辣,所以我就只是煮鱼头鱼腩部分,煮了两个大人分量,就只是老公和我的午餐。酸辣酸辣的味道我超喜欢。

材料:
一包Curry ASAM Mix
300ml 水
4条  羊角豆
1粒  红番茄
半条鱼 (我用牙点)

调味料:
耗油


步骤:

  1. 加入水和ASAM Mix 进锅里,煮直水滚。
  2. 放入其他材料和调味料煮10分钟至所有材料熟透,就可以上锅了。

Saturday 16 May 2020

豆沙包 Red Bean Bread


做了两款的面包。放冰箱冷藏第二天还是很软。好喜欢这款中种发做面包。做出来的面包超柔软!食谱来自于这里中种。豆沙的花样造型我学YouTube

材料清单: 中种面团: 高筋面粉 175g 水 108g 即发干酵母 3g 主面团: 前面制作的中种面团 高筋面粉 75g 糖 30g 盐 3g 牛奶(手揉使用冰的)30g 奶粉 10g 鸡蛋液 25g 软化的无盐黄油 30g 奶酥馅: 软化的无盐黄油 50g 糖 20g 盐 1g 鸡蛋液 30g 奶粉 80g 葡萄干或蔓越莓干 50g 装饰:少许面粉(什么面粉都行) 烤制:170°C/340°F烤17分钟(分成9份),或15分钟(如分成16份)。如果餐包摆的太密集,可以多烤2-3分钟。 Ingredients: Pre-ferment Dough(Biga): Bread Flour 175g Water 108g Instant Yeast 3g Main Dough: The pre-ferment made ahead Bread Flour 75g Sugar 30g Salt 3g Milk(Use cold if kneading by hand)30g Milk Powder 10g Beaten Egg 25g Softened Unsalted Butter 30g Filling: Softened Unsalted Butter 50g Sugar 20g Salt 1g Beaten Egg 30g Milk Powder 80g Raisins or Dried Cranberries 50g

我烤面包时烤箱温度我调到如以下图片的温度。每个人的烤箱温度都不同,所以根据个人烤箱来调节烤面包的温度。我烤大概13分钟。


Thursday 14 May 2020

Chocolate Cream Cheese Buttercream Frosting

My kids favourite chocolate cream cheese spread.  I use this recipe to make chocolate moist cake filling as well as chocolate spread for sandwich as breakfast / snack for my kids.

Chocolate Cream Cheese Buttercream Frosting

  • 340g cups butter softened **(170g)
  • 225g cream cheese softened **(112.5g)
  • 150g cups unsweetened cocoa powder **(75g)
  • 3 teaspoons vanilla extract **(1 1/2 tsp)
  • powdered sugar (adjust by own preference)
  • about 1/4 cup milk as needed **(1/8 cups)
Note : ** is half portion

Chocolate Cream Cheese Buttercream Frosting

  • In a large bowl, beat together butter and cream cheese until fluffy. Use a hand mixer or stand mixer for best results
  • Add in cocoa powder and vanilla extract. Beat until combined.
  • Beat in powdered sugar, 1 cup at a time. Add milk as necessary to make a spreadable consistency. The frosting should be very thick and will thicken even more if refrigerated.

饺子皮


材料:
300g 中筋面粉
1/4 tsp 盐
1 蛋清
100g 清水(比手温略高)

步骤:

  1. 粉,盐,水,蛋清依次加入容器,初步揉成团,成团即可,不用追求光滑无干粉,尽量把干粉塞到面团里面,面团可以放到揉面垫上,用盘子扣起来防止水分蒸发,醒发15-30分钟。
  2. 1的面团放到揉面垫上像揉馒头那样肉,用手掌根部推压,要用巧劲儿。揉到面团融合无干粉(如果面团非常难揉可以手掌沾水一点一点加进去,千万不要补太多水),继续放到保鲜膜里醒。
  3. 2次醒发后继续揉,揉到面团光滑不断筋,此时已经差不多了,再醒10分钟左右就可以做饺子皮了。也可以再醒揉一次。


奶香包 Steam Milk Pao

这个包子配方,是我用过最柔软的包子配方来制作包子,和生煎包。所以我收藏起来。

材料:
250g 中筋面粉
135g 水
1tsp 酵母
25g 细砂糖
5g 玉米油 / shortening / 猪油
15g 奶粉
1/4tsp 盐

步骤:

  1. 酵母用温水化开静置5分钟。
  2. 除水与酵母外材料放入面盘,盐放最下方,加入酵母水搅拌成絮状,和面至表面光滑。
  3. 盖上保鲜膜,进行第一次发酵1个小时 。
  4. 第一次发酵后,取出面团。分割成14个小面团。包好馅料。进行第二次发酵30分钟。
  5. 冷水上锅蒸8分钟。关火,不要立刻打开锅盖。再焖5分钟即可。

Sunday 10 May 2020

Mother's Day Cakes 2020 (Basque Burnt Cheese Cake & Cheese Cake)


Baked two types of cakes on this year Mother's Day.  I've seen a lot of people making the basque burnt cheese cake recently, so I've decided to make one for my mother as a mother's day cake.  We all love cheese.  The recipe adapted from a HERE.

Basque Burnt Cheese Cake

Ingredients :

  • 430g cream cheese, room temperature
  • 120g caster sugar
  • 3 large eggs, room temp (approx 150g of eggs without shell)
  • 270g heavy cream/thickened cream (35% min fat content)
  • 20g cake flour
  • 1 tsp vanilla extract
  • 1 tsp lemon juice
Making it
Line 6” circle cake tin with 2 layers of baking paper and trimmed to have an overhanging amount of 1.5″-2″.
Beat sugar and cream cheese together on medium until smooth and you can’t feel the sugar granules any longer. Scrape the bowl.
Add eggs one at a time and beat on medium until smooth. Scrape the bowl again to ensure that nothing sticks to the sides for even mixing.
Add the vanilla and lemon juice and beat until just mixed.
In a seperate bowl, mix flour and 1/4 of the cream and mix until smooth. Add another 1/4 more cream, mix, and then add the rest and mix until smooth. (Adding the flour a small amount at the time allows you to mix out any lumps that may form by creating a paste at the start.)
Slowly pour the cream/flour mixture into the cheese mixture whilst the mixer is beating on low until mixed through. Increase speed to medium and mix for 15 seconds just to ensure it’s all combined.
Preheat your oven and bake at 240C for 30-35mins until top is dark amber and almost charred at parts but the middles still has a wobble to them when you give the pan a jiggle.
Let cool in the tin fully on a wire rack at room temperature to allow the cheesecake to set.
Remove from the baking tin and enjoy at room temperature.
For a less “gooey” center, place into the fridge after cooled to allow it to chill and set.

For the Hello Kitty Cheese cake, the recipe I adapted from HERE. I didn't make snowy cheese cake for the topping as per the youtube.  I just change it to another decoration and put the mermaid hello kitty which I bought for my little girl at Mcd Happy Meal long time ago.  
Ingredients :
*7” cake pan line with parchment paper. *使用活动模的话,需在蛋糕模外包2张锡纸,防止在水浴法时,水流入蛋糕糊内。 A-烫面海绵蛋糕 Cotton Soft Sponge Cake: 植物油 Cooking oil 80g 底筋面粉 Cake flour 100g (过筛/sieved) 蛋黄 6 Egg yolks 全蛋 2 A size eggs 鲜奶 Fresh milk 100g 冰蛋白 6 Cold egg whites 细砂糖 Fine granulated sugar 80g B - 芝士酱 Cheese Filling: 室温软化无盐奶油 Unsalted Butter 125g 室温软化Cream cheese 250g 炼奶 Condensed milk 50g Whipping cream 100g 1 - A蛋糕: 植物油小火加热,煮至看到纹路,熄火。 边搅拌边倒入面粉中,迅速搅拌成顺滑的烫面糊。 Heat the oil over low heat for about 1 minutes. Pour the oil into the flour and quickly mix until well combined. 2。蛋黄+全蛋+鲜奶,搅拌均匀。 倒入烫面糊中,搅拌成顺滑的蛋黄糊。 过筛两次,用盖子盖着备用。 Whisk egg yolks + whole eggs + milk. Pour into the flour mixture, mix well. Sift the batter x 2 times, covered. 3。蛋白低速打至粗泡后,分3次倒入砂糖,打至硬性发泡。 Whisk egg whites + sugar until stiff peaks. Fold beaten egg whites into batter gently. 4。取1/3蛋白霜,倒入蛋黄糊里。 用刮刀由底往上轻轻切拌均匀。把边边和底部的蛋黄糊刮干净,拌均匀。 5。把蛋黄糊倒入剩余的2/3蛋白霜里,用刮刀轻轻切拌均匀。把边边和底部的蛋白霜刮干净,拌均匀。 6。把蛋糕糊倒入模型,在桌面轻敲数下,把蛋糕糊里面的气泡敲出。 Pour the batter into the cake pan, bang the pan to get the air bubbles out from the batter. 7。烤箱最下层放一片钢架。水浴法(外层烤盘倒入适量热水) 以160度烤35分钟,再以130度烤30分钟。 Lowest rack, water bath, 160℃ for 35 minutes. And then 130℃ for 30 minutes. 8。烤好后取出,往桌面轻敲一下散热,然后马上倒扣。5分钟后脱模、撕开烘培纸。 不要让风扇直吹着蛋糕,完全冷却后切成3片。 Bang the pan for few times, put the cake pan upside down on wire rack for 5 minutes, then tear away the parchment paper. Let cakes cool completely, then cut into 3 pieces. 9 - B 芝士酱 Cheese Filling: 无盐奶油 + Cream cheese + 炼奶打至乳白色。 倒入Whipping cream,再打1分钟。冷藏备用。Beat Butter + Cream cheese + Condensed milk until smooth and lighten in color. Add Whipping cream, whip for 1 minute. Refrigerate until cold. 10 - C:Cheedar cheese 磨成丝。(跳过这步骤如果不是弄芝士雪花蛋糕) Shredded cheddar cheese. (Skip this step if not making snowy cheese cake) 11。每一份蛋糕涂上芝士酱,重叠,直到完成 Spread cheese filling on each layer. 12。在最上层蛋糕上涂一层的芝士酱后,撒上Cheddar cheese丝,冷藏最少1个小时或隔夜 (跳过这步骤如果不是弄芝士雪花蛋糕) Spread cheese filling on the top layer. Sprinkle with shredded cheddar cheese. (Skip this step if not making snowy cheese cake) Chill for 1 hour or overnight.